
Transfer Learning #1 - Classification
Learning Goals
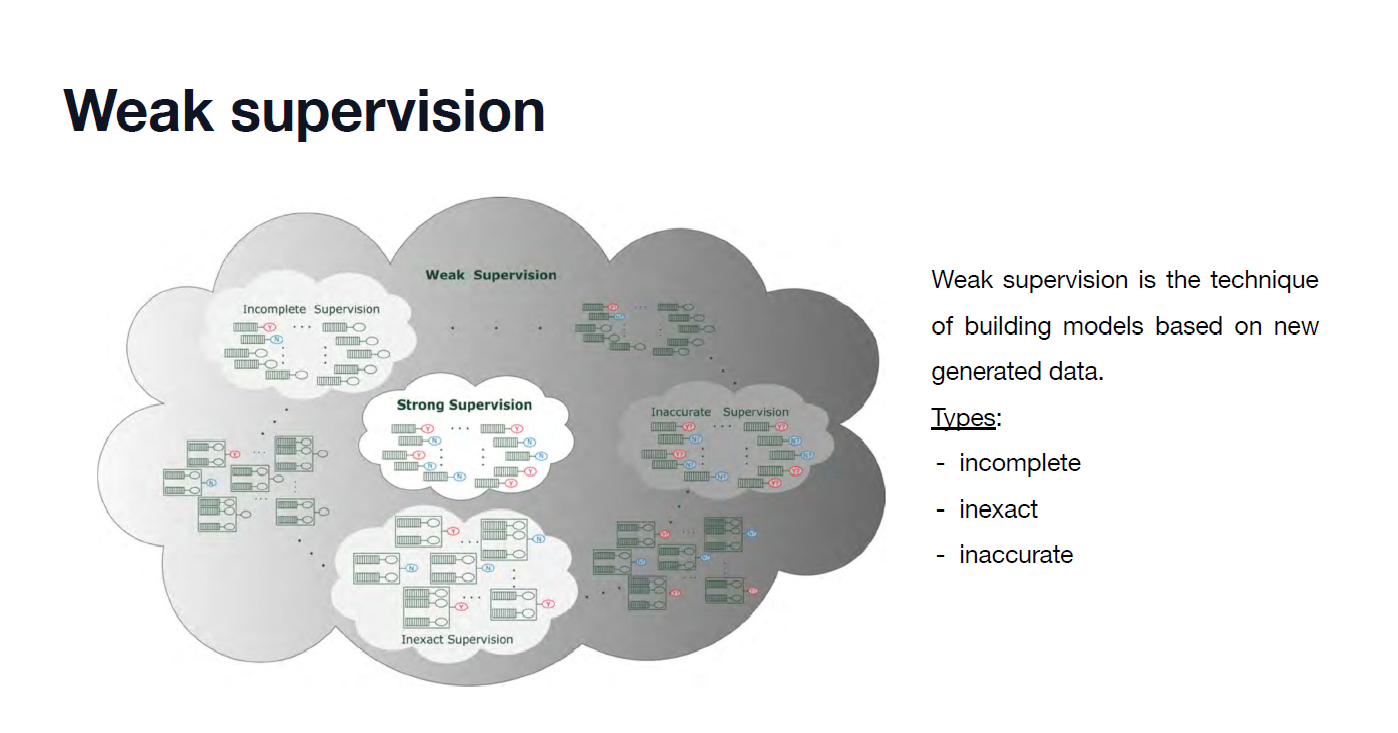
Transfer Learning 활용 이미지 분류 Image classification using Transfer Learning
Transfer Learning
Transfer learning is one of the most important techniques in deep learning.
1) 모델을 만들기 위한 데이터가 있어야 한다. You must have data to build the model.
2) 모델을 만들기 위한 computing 자원이 필요 -> 비용과 시간도 필요하다. Computing resources are required to create the model -> cost and time are also required.
3) 모델 설계 디자인도 직접 해야 한다 -> 전문가와 시간도 필요하다 You have to do the model design yourself -> Consultation time with Experts required
기존의 모델에서 잘 하는 부분을 우리만의 새로운 모델로 만드는 것! -> 우리의 데이터로 모델을 새로 학습시킨다! Using good parts of the original model for building our own new model -> From pre-trained model to new model with my data.
전이학습은 딥러닝에서 굉장히 중요한 기법중에 하나이다. Transfer learning is one of the most important techniques in deep learning.
- Computing 시간을 줄어준다 (기존 모델에 나의 데이터만 학습시키기 때문에) Saving computing time (Training the existing model with only my data)
- 적은 데이터로도 정확도를 얻을 수 있다. Accuracy can be obtained with little data.
Loading the pre-trained model - ImageNet
import tensorflow as tf
import pandas as pd
import numpy as np
import seaborn as sns
import matplotlib.pyplot as plt

model = tf.keras.applications.ResNet50(weights = "imagenet") # Loading the other model
‘ImageNet’이라는 여러 장의 이미지를 학습한 모델의 hyperparameters를 가져온다. Loading the hyperparameters of the model trained on multiple images called ‘ImageNet’.
이후에 소수의 이미지에 대한 학습이 추가된 모델로 활용하고자 한다. After that, we will use the parameters to build our model.
텐서플로우 라이브러리에서 제공해주는 샘플 이미지 몇 장을 가져와서 가져온 모델에 예측시켜보자. Loading a few sample images from the tensorflow library, we want to predict their class with the model.
new_Sample_Image = tf.keras.preprocessing.image.load_img("cat.282.jpg", target_size = (224, 224))

Sample_Image

이제 이미지를 신경망 학습에 용이한 형태로 변환하자. Now, let’s transform the image into a form that is suitable for neural network training.
new_Sample_Image = tf.keras.preprocessing.image.img_to_array(new_Sample_Image) # converting to ndarray

new_Sample_Image = np.expand_dims(new_Sample_Image, axis = 0) # (224, 224, 3) --> (1, 224, 224, 3)

new_Sample_Image = tf.keras.applications.resnet50.preprocess_input(new_Sample_Image) # converting to a form that is suitable for resnet

type(new_Sample_Image), new_Sample_Image.shape
(numpy.ndarray, (1, 224, 224, 3))
이제 해당 이미지를 ResNet 모델의 예측 입력 데이터로 활용할 준비가 끝났다. Now we are ready to use that image as predictive input data for our ResNet model.
predictions = model.predict(new_Sample_Image)
predictions.shape
(1, 1000)
1000개의 이미지 예측 분류 결과가 도출되었다. 1000 image prediction classification results were derived.
이 중에서 가장 연관성이 높은 10개의 결과를 불러와보자. Let’s recall the 10 most relevant results.
tf.keras.applications.resnet50.decode_predictions(predictions, top = 10)[0]
            [('n02123045', 'tabby', 0.6685119),
            ('n02123159', 'tiger_cat', 0.20534384),
            ('n04589890', 'window_screen', 0.04501871),
            ('n02124075', 'Egyptian_cat', 0.028584264),
            ('n02127052', 'lynx', 0.0222634),
            ('n02123394', 'Persian_cat', 0.0032146596),
            ('n02125311', 'cougar', 0.0023683226),
            ('n02123597', 'Siamese_cat', 0.0023211897),
            ('n04040759', 'radiator', 0.0019854198),
            ('n03938244', 'pillow', 0.0010624481)]
여러 가지 예측 결과 중에서 가장 연관성이 높은 10개를 보여준다. Among the various prediction results, the 10 most relevant are shown.
주어진 인풋 이미지에 대하여 ‘tabby’가 압도적으로 높은 예측 결과률을 보여준다 For a given input image, ‘tabby’ shows an overwhelmingly high prediction result rate.
model.summary()
            Model: "resnet50"
            __________________________________________________________________________________________________
            Layer (type)                   Output Shape         Param #     Connected to
            ==================================================================================================
            input_1 (InputLayer)           [(None, 224, 224, 3  0           []
                                            )]

            conv1_pad (ZeroPadding2D)      (None, 230, 230, 3)  0           ['input_1[0][0]']

            conv1_conv (Conv2D)            (None, 112, 112, 64  9472        ['conv1_pad[0][0]']
                                            )

            conv1_bn (BatchNormalization)  (None, 112, 112, 64  256         ['conv1_conv[0][0]']
                                            )

            conv1_relu (Activation)        (None, 112, 112, 64  0           ['conv1_bn[0][0]']
                                            )

            pool1_pad (ZeroPadding2D)      (None, 114, 114, 64  0           ['conv1_relu[0][0]']
                                            )

            pool1_pool (MaxPooling2D)      (None, 56, 56, 64)   0           ['pool1_pad[0][0]']

            conv2_block1_1_conv (Conv2D)   (None, 56, 56, 64)   4160        ['pool1_pool[0][0]']

            ...
            Total params: 25,636,712
            Trainable params: 25,583,592
            Non-trainable params: 53,120
            __________________________________________________________________________________________________
‘include_top=False’를 하면 convolution layer들만 가져오고 그 다음으로 우리가 만들고자 하는 모델에 새로운 Fully Connected Layer를 추가한다. ‘include_top=False’: Building our model that borrows the convolution layer from the existing model and new fully connected layers.
Expanding the model
x = base_model.output
x = tf.keras.layers.GlobalAveragePooling2D()(x)
x = tf.keras.layers.Dense(1024, activation = "relu")(x)
x = tf.keras.layers.Dense(1024, activation = "relu")(x)
x = tf.keras.layers.Dense(1024, activation = "relu")(x)
x = tf.keras.layers.Dense(512, activation = "relu")(x)
preds = tf.keras.layers.Dense(2, activation = "softmax")(x)

model = tf.keras.models.Model(inputs = base_model.input , outputs = preds)
len(model.layers)
181
hidden layer 등을 포함하는 모든 레이어 개수가 181개라는 것을 볼 수 있다. It can be seen that the number of all layers including hidden layers is 181.
실제 ImageNet 학습에 소요되는 시간은 어마어마하다. 우리는 그저 그 정보를 이용해 소량의 새로운 이미지와 모델 설계만 추가하여 목적에 맞는 task를 간편하게 완료한다. The time required for actual ImageNet training is enormous. We simply use that information to add a small number of new images and model designs to easily complete the task for the purpose.
이제 이 모델을 가지고 여러 task를 수행하면 된다. Now we can perform several tasks with this model.
지금까지는 전이 학습의 가장 기본적인 학습 구조를 알아보았다. So far, we have looked at the most basic learning structure of transfer learning.
다음 글에서 전이학습을 ‘실질적으로’ 이용하는 법을 알아보자. In the next article, we will see how to use transfer learning ‘practically’.


댓글남기기